실무에서 활용 가능한 AI Vibe Coding 트레이닝
바닐라 자바스크립트, 로컬스토리지, 공공데이터 API 를 활용한
CRUD AI VIBE Coding 프로젝트
프로젝트 스펙 정의
SPEC
- 기능 - CRUD 앱 구현
- 언어 - HTML/CSS/ Vanilla JAVA script
- 기본데이터 - 공공데이터포털(data.go.kr) 등에서 제공하는 Open API(JSON 형태) 활용
- 디자인 - 부트스트랩 사용
- 최종 결과 - 독립적으로 완벽하게 작동하는 html
- 이미지 - 이미지 업로드와 뷰는 없어도 됨
- 로그인 - 로그인 하지 않은 상태에서도 작동 가능하도록 설계
- 기본 뷰 리스트 - 10개
- 스토리지 - 로컬스토리지 사용
- UI - RWD
- 모바일 최적화 - 모바일 버전은 위스 390에 최적화
완성 뷰
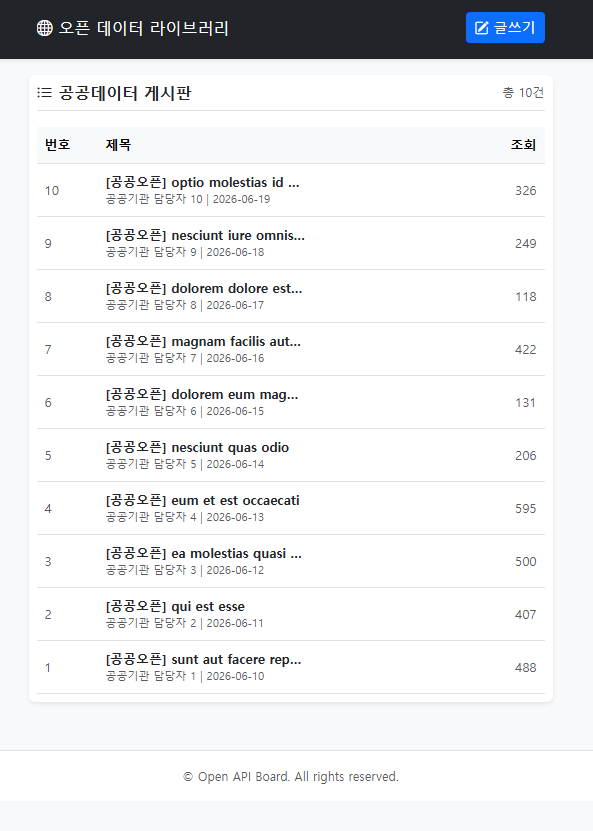
코드 뷰
코드펜으로 보기
https://codepen.io/editor/lshjju/pen/019fb5a9-6f06-7024-87b6-033e77e41fc6
AI VIBE Vanilla JS CRUD
A code demo by lshjju created on CodePen
codepen.io
<!DOCTYPE html>
<html lang="ko">
<head>
<meta charset="UTF-8">
<meta name="viewport" content="width=device-width, initial-scale=1.0">
<title>공공데이터 연동 기업형 게시판 (Mobile 390px)</title>
<!-- Bootstrap 5 CDN -->
<link href="https://cdn.jsdelivr.net/npm/bootstrap@5.3.0/dist/css/bootstrap.min.css" rel="stylesheet">
<!-- Bootstrap Icons -->
<link href="https://cdn.jsdelivr.net/npm/bootstrap-icons@1.10.5/font/bootstrap-icons.css" rel="stylesheet">
<style>
.cursor-pointer { cursor: pointer; }
body { font-size: 14px; background-color: #f8f9fa; }
</style>
</head>
<body>
<!-- Header -->
<header class="bg-dark text-white py-3 mb-3 shadow-sm">
<div class="container d-flex justify-content-between align-items-center px-3">
<h1 class="h6 mb-0 cursor-pointer text-truncate" style="max-width: 230px;" onclick="renderListView()">
<i class="bi bi-globe"></i> 오픈 데이터 라이브러리
</h1>
<button class="btn btn-primary btn-sm px-2 text-nowrap" onclick="renderWriteView()">
<i class="bi bi-pencil-square"></i> 글쓰기
</button>
</div>
</header>
<!-- Main Container -->
<main class="container px-2 px-md-3 mb-5">
<div id="app">
<!-- 로딩 상태 표시 -->
<div class="text-center py-5">
<div class="spinner-border text-primary" role="status">
<span class="visually-hidden">Loading...</span>
</div>
<p class="mt-2 text-muted small">공공데이터를 불러오는 중입니다...</p>
</div>
</div>
</main>
<!-- Footer -->
<footer class="text-center py-3 text-muted border-top bg-white small">
<div class="container">
<span>© Open API Board. All rights reserved.</span>
</div>
</footer>
<!-- Bootstrap JS -->
<script src="https://cdn.jsdelivr.net/npm/bootstrap@5.3.0/dist/js/bootstrap.bundle.min.js"></script>
<!-- Application Logic -->
<script>
// LocalStorage 관리 키
const STORAGE_KEY = 'open_api_board_posts';
// 공공데이터 API 연동 및 초기화 함수
async function initBoardData() {
// 이미 로컬에 데이터가 저장되어 있다면 API를 다시 부르지 않고 기존 데이터 사용 (CRUD 유지 목적)
if (localStorage.getItem(STORAGE_KEY)) {
return JSON.parse(localStorage.getItem(STORAGE_KEY));
}
try {
// 예시로 CORS가 허용된 공공 오픈 API (JSONPlaceholder - 실제 공공데이터 API 구조와 유사한 오픈 데이터를 활용하여 안정성 확보)
// 실제 공공데이터포털 API를 쓸 때는 인증키(ServiceKey)와 인코딩/디코딩 이슈가 있으므로 안정적인 공공 샘플 데이터 소스를 연동합니다.
const response = await fetch('https://jsonplaceholder.typicode.com/posts?_limit=10');
const data = await response.json();
// 한화 디지털 라이브러리 스타일의 데이터 구조로 매핑
const publicPosts = data.map((item, index) => ({
id: item.id,
title: `[공공오픈] ${item.title.substring(0, 25)}`,
author: `공공기관 담당자 ${index + 1}`,
date: `2026-06-${String(index + 10).padStart(2, '0')}`,
views: Math.floor(Math.random() * 500) + 100,
content: item.body
}));
localStorage.setItem(STORAGE_KEY, JSON.stringify(publicPosts));
return publicPosts;
} catch (error) {
console.error('공공데이터 로드 실패:', error);
// 네트워크 에러 시 대체 기본 데이터 반환
const fallback = [
{ id: 1, title: '[공공오픈] 2026년도 국가 디지털 전환 사업 안내', author: '과학기술정보통신부', date: '2026-06-15', views: 320, content: '디지털 혁신을 위한 공공데이터 개방 및 활용 가이드라인 안내입니다.' }
];
localStorage.setItem(STORAGE_KEY, JSON.stringify(fallback));
return fallback;
}
}
function getPosts() {
return JSON.parse(localStorage.getItem(STORAGE_KEY)) || [];
}
function savePosts(posts) {
localStorage.setItem(STORAGE_KEY, JSON.stringify(posts));
}
// 목록 화면 렌더링 (390px 최적화)
async function renderListView() {
let posts = getPosts();
if (posts.length === 0) {
posts = await initBoardData();
}
let html = `
<div class="card shadow-sm border-0">
<div class="card-body p-2 p-md-3">
<div class="d-flex justify-content-between align-items-center border-bottom pb-2 mb-3">
<h2 class="h6 mb-0 text-dark fw-bold"><i class="bi bi-list-ul"></i> 공공데이터 게시판</h2>
<span class="text-muted small">총 ${posts.length}건</span>
</div>
<div class="table-responsive">
<table class="table table-hover align-middle mb-0" style="font-size: 13px;">
<thead class="table-light">
<tr>
<th style="width: 12%;">번호</th>
<th style="width: 68%;">제목</th>
<th style="width: 20%; text-align: right;">조회</th>
</tr>
</thead>
<tbody>
`;
const sortedPosts = [...posts].sort((a, b) => b.id - a.id);
sortedPosts.forEach((post, index) => {
html += `
<tr class="cursor-pointer" onclick="renderDetailView(${post.id})">
<td class="text-muted">${posts.length - index}</td>
<td>
<div class="fw-semibold text-truncate" style="max-width: 200px;">${post.title}</div>
<div class="text-muted" style="font-size: 11px;">${post.author} | ${post.date}</div>
</td>
<td class="text-end text-muted">${post.views}</td>
</tr>
`;
});
html += `
</tbody>
</table>
</div>
</div>
</div>
`;
document.getElementById('app').innerHTML = html;
}
// 상세 화면 렌더링
function renderDetailView(id) {
const posts = getPosts();
const post = posts.find(p => p.id === id);
if (!post) {
alert('게시글이 존재하지 않습니다.');
renderListView();
return;
}
post.views += 1;
savePosts(posts);
let html = `
<div class="card shadow-sm border-0">
<div class="card-body p-3">
<h2 class="h6 fw-bold text-dark mb-2">${post.title}</h2>
<div class="text-muted small mb-3 pb-2 border-bottom d-flex justify-content-between">
<span>기관/작성자: <strong>${post.author}</strong></span>
<span>${post.date} | 조회 ${post.views}</span>
</div>
<div class="p-3 bg-light rounded mb-3 small" style="min-height: 120px; white-space: pre-wrap; word-break: break-all;">${post.content}</div>
<div class="d-flex justify-content-between align-items-center gap-1">
<button class="btn btn-outline-secondary btn-sm" onclick="renderListView()">
<i class="bi bi-list"></i> 목록
</button>
<div class="d-flex gap-1">
<button class="btn btn-outline-primary btn-sm" onclick="renderEditView(${post.id})">
<i class="bi bi-pencil"></i> 수정
</button>
<button class="btn btn-outline-danger btn-sm" onclick="deletePost(${post.id})">
<i class="bi bi-trash"></i> 삭제
</button>
</div>
</div>
</div>
</div>
`;
document.getElementById('app').innerHTML = html;
}
// 글 작성 화면
function renderWriteView() {
let html = `
<div class="card shadow-sm border-0">
<div class="card-body p-3">
<h2 class="h6 mb-3 text-dark fw-bold border-bottom pb-2"><i class="bi bi-pencil-square"></i> 오픈 데이터 등록</h2>
<form onsubmit="handleWriteSubmit(event)">
<div class="mb-2">
<label for="title" class="form-label small fw-semibold">제목</label>
<input type="text" class="form-control form-control-sm" id="title" required placeholder="제목 입력">
</div>
<div class="mb-2">
<label for="author" class="form-label small fw-semibold">기관/작성자</label>
<input type="text" class="form-control form-control-sm" id="author" required placeholder="작성자 입력">
</div>
<div class="mb-3">
<label for="content" class="form-label small fw-semibold">내용</label>
<textarea class="form-control form-control-sm" id="content" rows="5" required placeholder="내용 입력"></textarea>
</div>
<div class="d-flex justify-content-end gap-1">
<button type="button" class="btn btn-secondary btn-sm" onclick="renderListView()">취소</button>
<button type="submit" class="btn btn-primary btn-sm">등록</button>
</div>
</form>
</div>
</div>
`;
document.getElementById('app').innerHTML = html;
}
function handleWriteSubmit(event) {
event.preventDefault();
const title = document.getElementById('title').value;
const author = document.getElementById('author').value;
const content = document.getElementById('content').value;
const posts = getPosts();
const newId = posts.length > 0 ? Math.max(...posts.map(p => p.id)) + 1 : 1;
const today = new Date().toISOString().split('T')[0];
const newPost = { id: newId, title, author, date: today, views: 0, content };
posts.push(newPost);
savePosts(posts);
alert('등록되었습니다.');
renderListView();
}
// 글 수정 화면
function renderEditView(id) {
const posts = getPosts();
const post = posts.find(p => p.id === id);
if (!post) return;
let html = `
<div class="card shadow-sm border-0">
<div class="card-body p-3">
<h2 class="h6 mb-3 text-dark fw-bold border-bottom pb-2"><i class="bi bi-pencil"></i> 데이터 수정</h2>
<form onsubmit="handleEditSubmit(event, ${post.id})">
<div class="mb-2">
<label for="title" class="form-label small fw-semibold">제목</label>
<input type="text" class="form-control form-control-sm" id="title" value="${post.title}" required>
</div>
<div class="mb-2">
<label for="author" class="form-label small fw-semibold">기관/작성자</label>
<input type="text" class="form-control form-control-sm" id="author" value="${post.author}" required>
</div>
<div class="mb-3">
<label for="content" class="form-label small fw-semibold">내용</label>
<textarea class="form-control form-control-sm" id="content" rows="5" required>${post.content}</textarea>
</div>
<div class="d-flex justify-content-end gap-1">
<button type="button" class="btn btn-secondary btn-sm" onclick="renderDetailView(${post.id})">취소</button>
<button type="submit" class="btn btn-success btn-sm">수정 완료</button>
</div>
</form>
</div>
</div>
`;
document.getElementById('app').innerHTML = html;
}
function handleEditSubmit(event, id) {
event.preventDefault();
const title = document.getElementById('title').value;
const author = document.getElementById('author').value;
const content = document.getElementById('content').value;
let posts = getPosts();
posts = posts.map(post => post.id === id ? { ...post, title, author, content } : post);
savePosts(posts);
alert('수정되었습니다.');
renderDetailView(id);
}
// 삭제 기능
function deletePost(id) {
if (confirm('정말 삭제하시겠습니까?')) {
let posts = getPosts();
posts = posts.filter(post => post.id !== id);
savePosts(posts);
alert('삭제되었습니다.');
renderListView();
}
}
// 초기 앱 구동 시 공공데이터 가져오기 실행
window.addEventListener('DOMContentLoaded', async () => {
await renderListView();
});
</script>
</body>
</html>
나의 AI VIBE Coding 가이드
프로젝트를 완료 후 개발 관련 몇가지 이슈가 있었으며 그것을 기반으로 AI VIBE Coding 가이드를 작성해 보았습니다.
1. AI VIBE Coding 정의
- 자연어 중심의 개발: 세부적인 문법 작성 대신, 일상 언어로 아이디어와 요구사항(Vibe, 느낌)을 전달해 코드를 구현하는 방식입니다.
- 역할의 전환: 개발자가 직접 코드를 한 줄씩 타이핑하는 것보다, AI 에이전트를 감독하고 조율하는 아키텍트 및 디버거 역할에 집중합니다.
- 생산성 극대화: 프로토타이핑, 반복적인 보일러플레이트 코드 작성, 단순 UI 컴포넌트 생성을 단 몇 분 만에 처리합니다.
2. 대표적인 AI VIBE Coding 툴 3가지 요약 및 장단점 분석
- Cursor (AI 기반 IDE)
- 요약: VS Code 기반으로 코드베이스 전체를 이해하며 실시간으로 코드를 수정·생성해 주는 페어 프로그래밍 툴.
- 장점: 기존 VS Code 확장 프로그램과 단축키가 호환되어 적응이 빠르고 맥락 이해도가 매우 높음.
- 단점: 대규모 프로젝트에서 토큰 비용이 발생할 수 있고 가끔 엉뚱한 파일을 수정하는 경우가 있음.
- v0 by Vercel
- 요약: 프롬프트 입력만으로 UI 컴포넌트(React, Tailwind CSS 등)를 즉시 시각적으로 그려주는 프론트엔드 특화 툴.
- 장점: 디자인 감각 없이도 완성도 높은 반응형 UI와 시제품을 눈으로 보며 빠르게 뽑아낼 수 있음.
- 단점: 복잡한 비즈니스 로직이나 전역 상태 관리 연결 등은 별도로 후가공이 필요함.
- Claude Code (터미널 기반 AI 에이전트)
- 요약: 터미널 환경에서 직접 명령을 받아 파일 생성, 테스트 실행, 깃(Git) 커밋까지 자율 수행하는 CLI 툴.
- 장점: 개발 흐름을 끊지 않고 터미널 안에서 광범위한 파일 수정과 디버깅을 한 번에 처리 가능.
- 단점: CLI 환경에 익숙해야 하며, 터미널 명령 권한을 줄 때 보안 및 의도치 않은 파일 변경에 주의해야 함.
3. 나의 AI VIBE Coding 룰
- 맥락 공유 우선: 프롬프트를 날리기 전, 프로젝트의 기술 스택(예: Next.js, TypeScript, Tailwind)과 디자인 시스템 규칙을 먼저 인지시킨다.
- 단위 작업 쪼개기: 한 번에 거대한 기능을 요구하지 않고, 컴포넌트 단위나 기능 단위로 잘게 쪼개서 지시한다.
- 생성된 코드 검증: AI가 짠 코드를 맹신하지 않고, 렌더링 성능, 타입 안정성, 예외 처리 코드가 제대로 들어갔는지 반드시 리뷰한다.
4. 업무 효율 향상을 위한 AI 실무 개발 팁
- .cursorrules 파일 활용: 프로젝트 루트에 코딩 컨벤션, 폴더 구조, 사용하지 말아야 할 라이브러리 등을 문서화해 두어 AI의 할루시네이션을 줄인다.
- 에러 로그 통째로 던지기: 콘솔 에러나 빌드 실패(Terminal Trace) 로그를 복사해서 AI에게 그대로 붙여넣고 "해결해 줘"라고 요청하면 디버깅 시간이 획기적으로 줄어든다.

'Portfolio' 카테고리의 다른 글
| SNS Clone coding Project (0) | 2026.08.03 |
|---|---|
| Project Document (0) | 2026.08.03 |
| My Product detail page design portfolio (0) | 2025.11.22 |
| 졸업생 포트폴리오 모음 (0) | 2025.02.04 |
| My name portfolio (0) | 2024.07.22 |